Before & After {Massage Room}

I have finally finished converting my basement into a new massage room that will serve as one of my two locations when I start up my business in the next couple of weeks. It has been quite a process, but I love the results. I gave a few test drive massages to some neighbors this weekend and they both really liked the room and commented on how calming and serene it felt. It really does feel like you are retreating from the world when you’re down there.

Here are some before shots. On the left is a picture of what the room looked like when we first moved into our house and used the basement as a study/tv room. The right is a shot of all the massage room stuff piled up in the center as we prepped for painting.

And here it is after!

The cool screen that serves as the “door” was hand painted by my sister.

As was this awesome picture that hangs above my little tea station.

Check out these awesome mini pitchers that my mom picked up for me during her trip to Ecuador. I love them because they are so one-of-a-kind and special, which is how I wanted my massage room to feel.

New Look: Shelf

The last project of my daylong crafting extravaganza was an old three shelf unit that we had been using for shoe storage. It is just one of those cheap, little shelves that you can get from Target and over the years it had become increasing dingy and stained. I wanted to be able to use it for extra shelf space in the study, so I decided to fix it up.

I tried to take some cleaner to it to remove some of the worst splotches, but had little luck. So instead I used three types of decorative paper that I got from Michaels and covered each shelf. I then cut the paper into different sized squares and rectangles and pasted them over the worst of the stains on each side.

Here it was before:

img_2952

And after:

img_2981

img_2990

img_2989

New Look: Trunk

My second project of the day was to do something with the trunk I’ve had since I first started college. When I headed off to school, I needed something that would hold a lot of stuff, but not take up too much space in a dorm room. While this trunk has always served me well, it’s a hideously ugly eyesore and has “I bought this piece of crap for college” written all over it. I’ve tried covering it with decorative cloths, but they always manage to slide off and end up in a pile on the floor.

I didn’t have the energy to give it a full overhaul, but decided to do something about the top surface and make the trunk more functional by filling it with extra pillows and blankets and positioning it at the foot of the bed.

img_2932Here it is before, in all it’s gray hideousness.

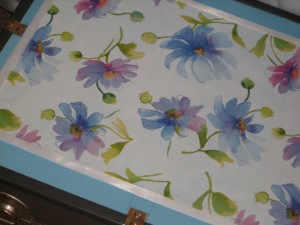
I used a thicker paper that I got from Michael’s to line the edges and then applied some floral wrapping paper to the center. To disguise my inability to cut in a straight line, I covered the edges of the wrapping paper with strips of white ribbon.

img_3000

img_3002

img_2994

I think it is a dramatic improvement!

New Look: Photo Boxes

Yesterday was a big time crafts day for me. I finished a bunch of projects and even got most of the way through rearranging our bedroom/study areas (we are trying to limit the amount of furniture placed against the wall because the cat likes to stand on it and knock down all our pictures!).

It was quite cold and windy yesterday, so I was completely happy to plop down on the floor, pop in my favorite movie and get going on those photo storage boxes I talked about the other day.

img_2927

I took some old shoe boxes I had lying around. Just a little colorful wrapping paper, some Scotch tape and honestly, a bit of headache later and…

Voila!

img_2960I already filled one with a bunch of old poems and story notes and another with envelopes that we had piled up on a shelf. There’s more room in the closet now with some of these boxes out of the way and they are adding a nice bit of color to the bookshelves in our study. I’m pretty pleased with the result.